Pickup covers – some people love ‘em, some people hate ‘em. But luckily you don’t need to live with them if you are one of the latter! In this guide, we’ll discover how to remove humbucker covers.
Removing the cover from your guitar’s pickup is a job so simple that even I could bungle my way through it.
Don’t believe me? Read on…
Before embarking on this DIY adventure make sure that you are aware of the likely outcome of your endeavors. It’s easy to remove humbucker covers, but it’s a much bigger job to put them back on!
While removing the cover will alter the appearance of your axe, it will also affect its tonal characteristics. Most of the time, removing the cover will make your guitar sound brighter and more lively.
It will also most likely invalidate your warranty if you have one.
If you don’t have a problem with any of that then let’s have a go! I’ll be using my cheapo Vintage V100 Les Paul copy for this example.
I always found the tone of this guitar a little too mellow for my tastes. So I’m hoping it will have a little more grunt by the time I’m finished!
How To Remove Humbucker Covers
Step 1: Remove the pickup(s)
Get rid of your strings and unscrew the humbuckers.
If your pickup has enough wire length you can get away with simply flipping it over and resting it on the guitar body. This will save you from having to solder any wiring.
Make sure to protect the finish by placing something between the pickup and the guitar – things are about to get messy!
Step 2: Fire Up the Soldering Iron
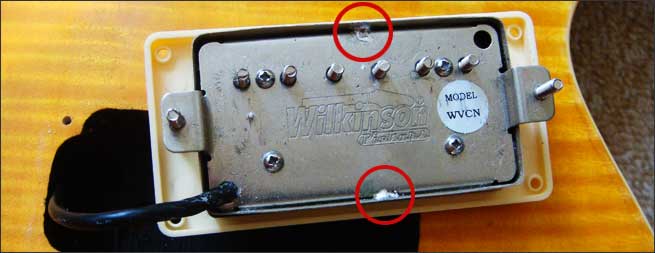
In the photo below I’ve highlighted the two blobs of solder that are holding the humbucker cover in place.
In order to remove the cover we’re going to need to get rid of these – duh!

So, using the tip of your soldering iron, carefully heat up the solder until it turns liquid.
Now you can either wipe it away with a thick cloth, or use a specialized option such as a solder sucker or desoldering wick.
Be careful not to burn yourself as molten metal on your skin equals a bad time!
If you don’t own a soldering iron, check out my guide to soldering irons for guitar. You should be able to pick up everything you need for under $20.
Luckily for me, mine had such a pitiful amount of solder that I was able to simply snap it off using a flat screwdriver – good times!
Step 3: Remove Humbucker Covers
Gently push the cover away from the baseplate using a screwdriver.
The only thing holding the cover in place now is the wax so it should come off fairly smoothly.
If you’re having trouble getting it off, simply apply a little heat to the pickup cover to help soften the wax.

Step 4: Clean Up the Mess
After removing the cover you are going to be left with a fairly standard-looking black humbucker, with the rather obvious exception being that it is coated in nasty-looking wax.
There are a number of ways to remove this, but I decided to just chip away at it with a small flat screwdriver.
I used my fingernail to remove any wax on top just to ensure I didn’t scratch any of the nice, shiny finish.
Be very careful at the end of the pickup where the wires protrude, you don’t want to accidentally cut into one of these.
Wondering why guitar pickups have that wax coating? Find out more.
Step 5: Reinstall The Humbuckers
Give them a quick clean with a cloth and screw them back into your guitar, being careful to ensure they are placed exactly as they were before.
Now restring and admire your handiwork!
The Results


To be honest I’m a little indifferent as to whether it looked better before or after, it’s much of a muchness really. I guess it looks a little edgier with its new naked appearance.
What has improved (for me) is the tone of the guitar – it’s definitely a lot brighter now and I’m really happy with the new sound. Result!
As you have seen, it’s not as hard a job as you may think to remove humbucker covers from your guitar. If I can do it, anyone can! Give it a shot and perhaps breathe some new life into your instrument.


Comments are closed.